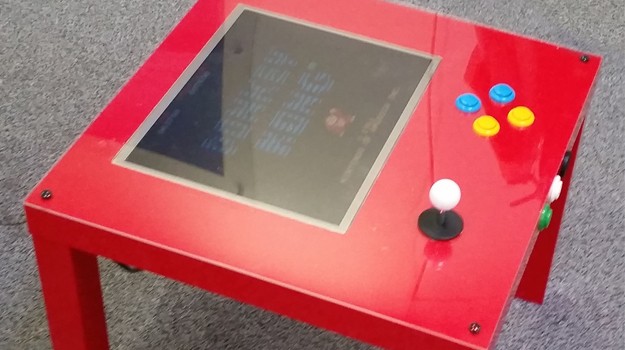
It looks like I’ve finally found just what I want to do with my Arduino Leonardo, Raspberry Pi, and old school joystick and perfectly mashable buttons – thanks to spannerspencer at element14. He released the blueprints for transforming one of those inexpensive IKEA LACK side tables into a perfectly retro gaming table!
Here’s what you’ll need:
- A Raspberry Pi 3 Model B – $35.00
- 2.5A USB Power Supply – $10.00
- An Arduino Leonardo – $24.00
- Balltop Joystick – $8.00
- 4 Buttons, you choice of color – $1.40 each ($5.60 total)
- Arctic USB Powered Speakers – $27.00
- IKEA LACK Table in Red (or your favorite color) – $13.00
- 17″ LCD 4:3 Monitor – don’t buy new, look on eBay or ask around!
- Screws, cables, connectors, drill, 13mm drill it, box cutter, tape, clamps
Not counting the monitor and the little bits that you may already have lying around your workshop, the project comes in at $122.60! And of course, this is just based on the parts suggested by spannerspencer. I usually grab my LACK tables in IKEA’s scratch-and-dent section. You can get their cool color ones for around $7.00, and their standard black one for $5.00. They’re great if you want to do a custom color job on them to match your gaming space! It’s also good in case you destroy the table during the cutting process, like what happened in the first go around of this build.

Of course, it’s not about slapping some pieces together inside a glorified cardboard side table. There is some engineering and computer programming involved. Luckily element14 has all that covered for you. The Arduino Leonardo is what speaks to the Raspberry Pi and the controls to allow them to work. This particular graph will allow you to configure your buttons for the classic Multiple-Arcade-Machine-Eumlator style of gameplay.
As for the programming part – that’s the easiest bit. Aside from some troubleshooting, you should just be able to download the Arduino IDE by plugging it in via USB to your computer, and the guys at element14 have worked out a sketch code that should make the button configuration work smoothly once you’re up and running. Copy the code on their website and paste it into the IDE window, then go to the Tools menu, hit Arduino Leonardo, the Board. Then go back to Tools and select the Leonardo drop down from the Ports menu. Hit upload and your Arduino board is online.
Next it’s just a matter of getting your Raspberry Pi up and running, and that’s easier than installing Windows 10. Download and install RetroPie – which you can do so by getting it right here.
Like I said, I’ve been sitting on most of these parts for awhile now (though I probably should upgrade to a Pi 3 Model B, because why not) and this looks like a seriously fun project to have around the house when entertaining guests, or when I need a break from writing about how fun it would be to make all these cool things.
Original Article: https://www.element14.com/community/docs/DOC-80946?CMP=SOM-FACEBOOK-PRG-RASPI-PI3-RETROGAMING#